


The Ultimate Pav Bhaji Recipe: Mumbai’s Street Food Sensation at Home
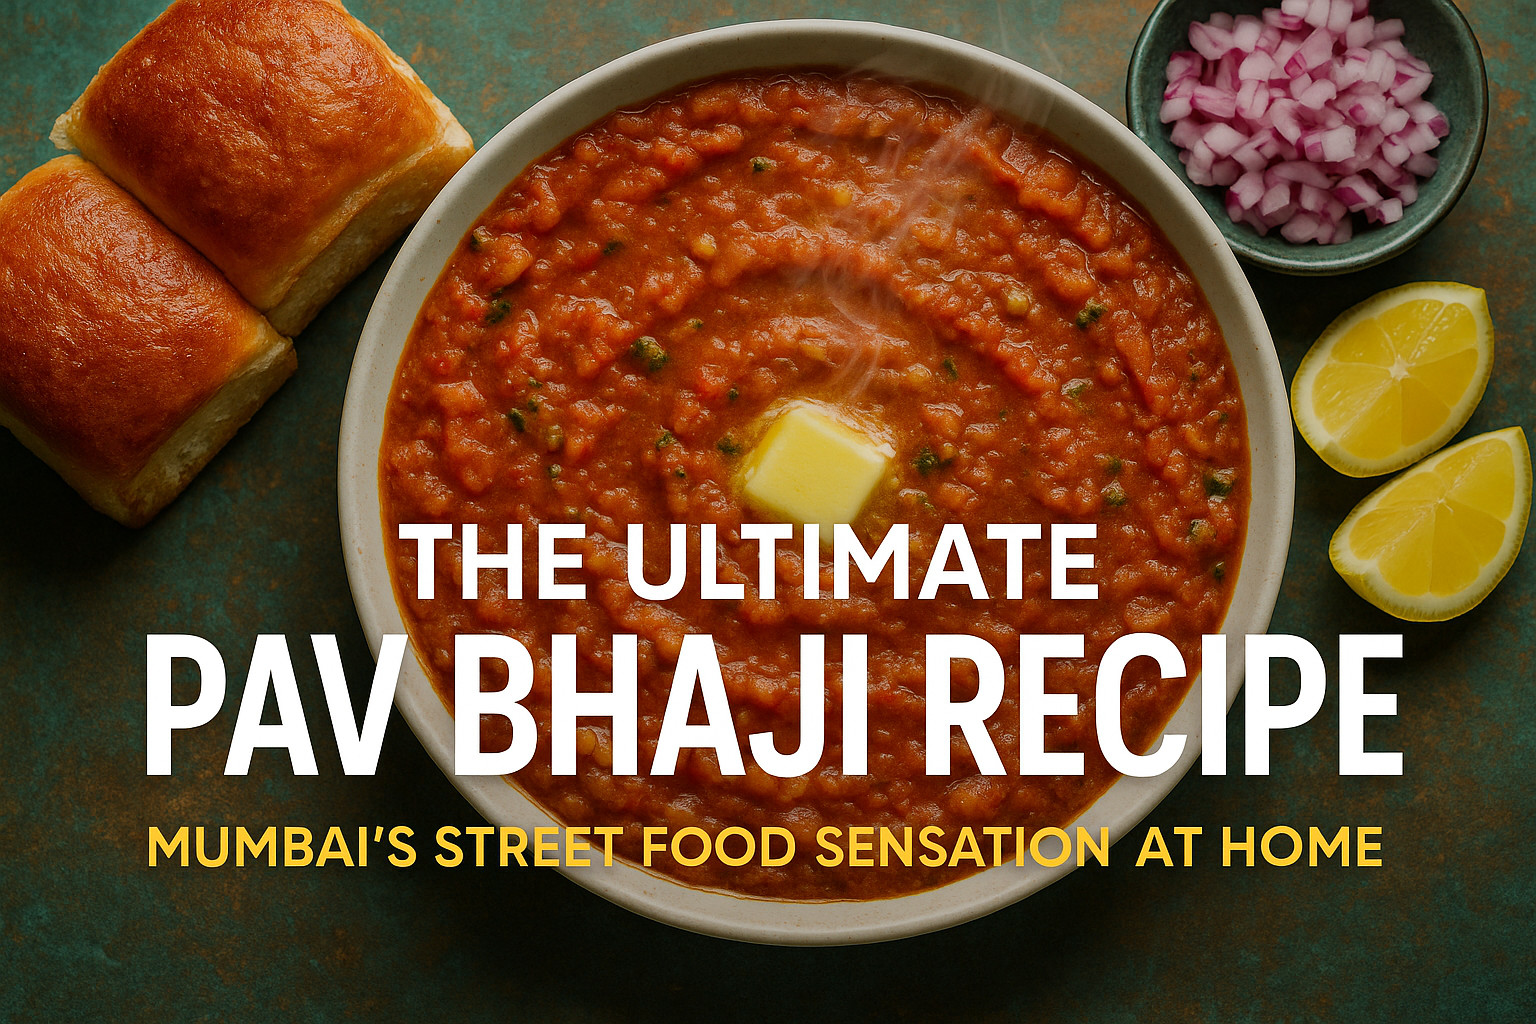
The sizzle of a buttery tava, the aromatic blend of spices, and the vibrant red hue of mashed vegetables – these are the hallmarks of pav bhaji, Mumbai’s most beloved street food. This iconic dish combines spicy, tangy vegetable curry (bhaji) with soft, buttered bread rolls (pav) to create a flavor explosion that has captivated food lovers worldwide. Whether you’re craving a taste of India or looking to master this culinary classic, this comprehensive guide will walk you through creating authentic pav bhaji in your own kitchen.
Key Takeaways
- Origin Story: Pav bhaji originated in 1850s Mumbai as a quick, nutritious meal for textile mill workers and has evolved into one of India’s most popular street foods.
- Perfect Texture: The secret to authentic pav bhaji lies in achieving the right consistency – vegetables should be thoroughly cooked and mashed but retain some texture.
- Spice Balance: The signature flavor comes from the special pav bhaji masala, a blend of 10+ spices that creates its distinctive taste.
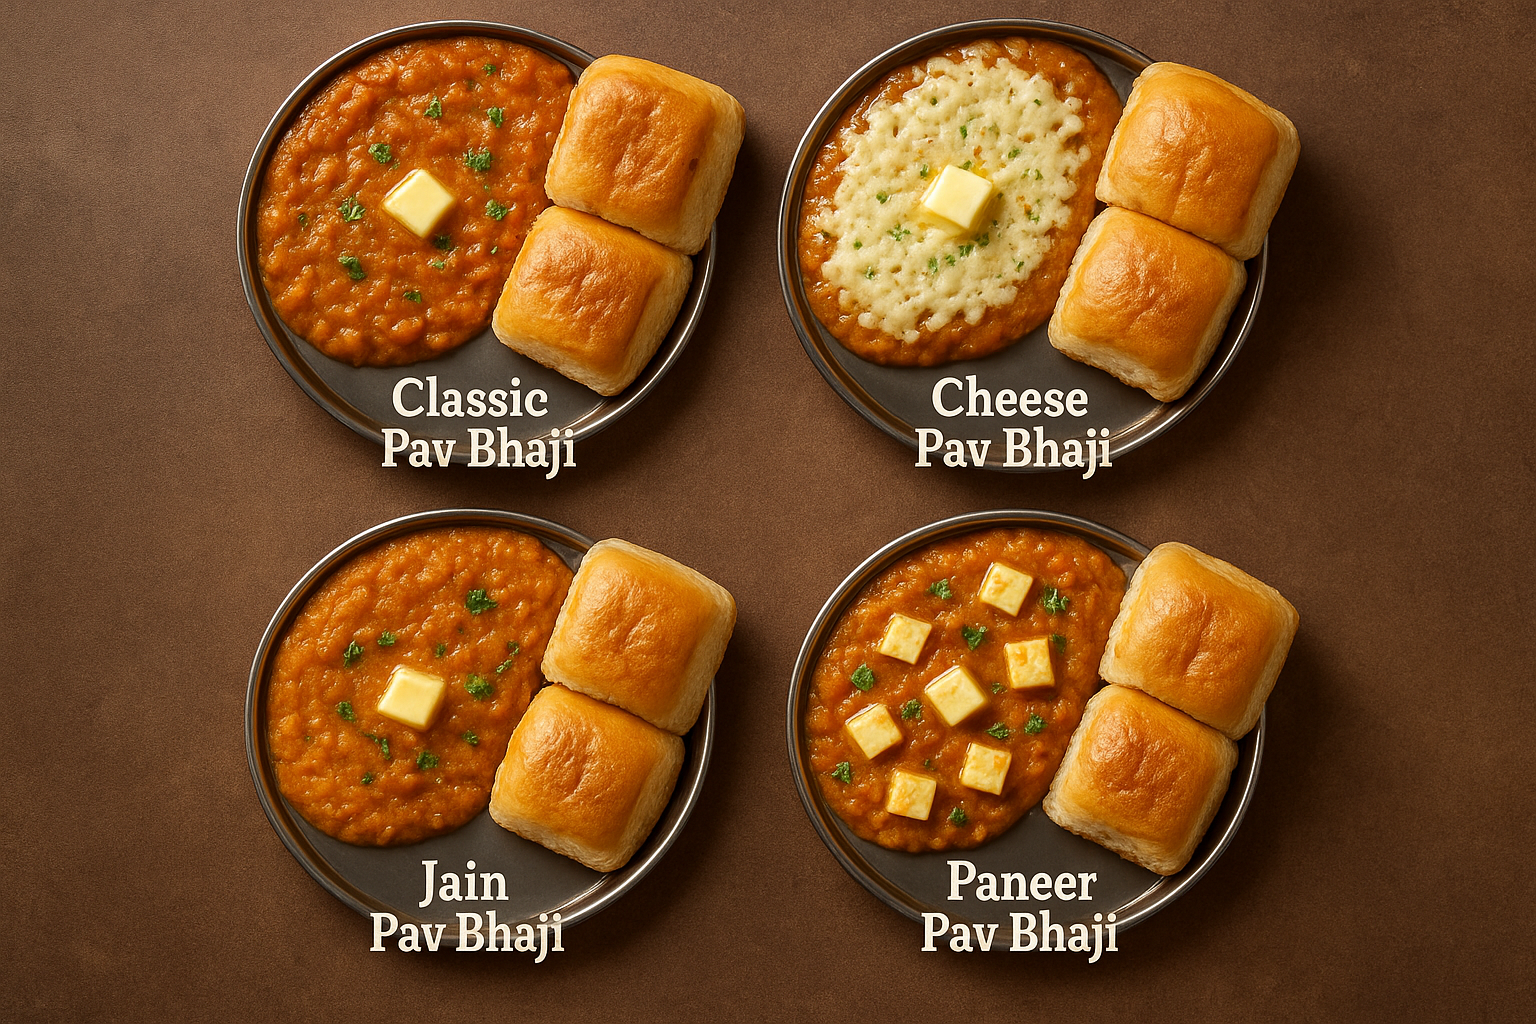
- Customization Options: The basic recipe can be adapted for dietary preferences with variations like cheese pav bhaji, Jain pav bhaji (no onion/garlic), or paneer pav bhaji.
- Serving Technique: Always serve pav bhaji hot with butter-toasted pav, finely chopped onions, lemon wedges, and fresh coriander for the authentic experience.
The History and Cultural Significance of Pav Bhaji
Origins of Mumbai’s Favorite Street Food
The story of pav bhaji begins in the 1850s in Mumbai (formerly Bombay), during the textile mill boom. Mill workers needed a quick, nutritious meal during their short lunch breaks. Innovative street vendors created a solution by mashing together leftover vegetables with spices and serving them with bread – thus, pav bhaji was born.
Initially a humble worker’s meal, pav bhaji gradually gained popularity across all social classes. The name itself tells its story – “pav” refers to the small bread rolls (derived from the Portuguese word “pão”), while “bhaji” means vegetable dish in Marathi.
From Street Corners to Global Recognition
What started as a practical meal for laborers has transformed into an international sensation. Today, pav bhaji stalls can be found on nearly every street corner in Mumbai, each vendor claiming their secret recipe is the best. The dish has transcended its humble origins to appear on menus of high-end restaurants both in India and abroad.
The cultural significance of pav bhaji extends beyond its taste – it represents Mumbai’s fast-paced lifestyle and the city’s ability to create extraordinary flavors from ordinary ingredients. It’s a dish that brings people together, transcending social barriers and regional differences.
Essential Ingredients for Authentic Pav Bhaji
The Vegetable Base
The foundation of any good pav bhaji is its vegetable mixture. While recipes vary, these core vegetables are essential:
- Potatoes (4 medium): The primary vegetable that gives body and creaminess
- Cauliflower (1 cup, chopped): Adds texture and absorbs flavors beautifully
- Carrots (2 medium): Provides natural sweetness and nutrition
- Green peas (1/2 cup): Adds color, texture, and subtle sweetness
- Bell peppers (1 medium): Contributes freshness and slight crunch
- Tomatoes (4 large): Creates tanginess and the signature red color
The proportion of vegetables can be adjusted according to preference, but potatoes should always form the largest component, comprising about 40-50% of the vegetable mixture.
The Signature Spice Blend: Pav Bhaji Masala
The soul of pav bhaji lies in its distinctive spice blend. While pre-made pav bhaji masala is readily available in stores, understanding its components helps achieve that authentic taste:
| Spice | Quantity | Flavor Contribution |
|---|---|---|
| Coriander powder | 2 tablespoons | Earthy, citrusy base note |
| Cumin powder | 1 tablespoon | Warm, nutty undertone |
| Red chili powder | 1-2 teaspoons | Heat and color |
| Turmeric powder | 1/2 teaspoon | Earthy flavor and golden hue |
| Amchur (dried mango powder) | 1 teaspoon | Tangy, sour note |
| Garam masala | 1/2 teaspoon | Aromatic complexity |
| Black pepper | 1/2 teaspoon | Sharp heat |
| Asafoetida (hing) | 1/4 teaspoon | Savory depth |
For convenience, you can use 2-3 tablespoons of store-bought pav bhaji masala instead of combining these individual spices.
Fresh Aromatics and Flavor Enhancers
These ingredients bring freshness and depth to your pav bhaji:
- Onions (2 large): Finely chopped, provides sweetness and body
- Ginger (2-inch piece): Grated, adds warmth and digestive benefits
- Garlic (8-10 cloves): Minced, contributes savory depth
- Green chilies (2-3): Finely chopped, for fresh heat
- Butter (1/2 cup): Preferably Amul or another good quality brand
- Lemon juice (2 tablespoons): Brightens all flavors
- Fresh coriander leaves (1/2 cup): For garnish and fresh flavor
- Kasuri methi (dried fenugreek leaves, 1 tablespoon): Optional but adds authentic flavor
The Perfect Pav (Bread Rolls)
While the bhaji gets most of the attention, the pav is equally important:
- Soft bread rolls (12 pieces): Traditional Mumbai pav has a slightly sweet flavor
- Butter (1/4 cup): For toasting the pav
- Garlic (optional, 2-3 cloves): Minced, for making garlic butter pav
The best pav for this dish is soft and slightly chewy with a thin crust. If you can’t find traditional pav, dinner rolls or burger buns make acceptable substitutes.
Step-by-Step Pav Bhaji Recipe
Preparation of Vegetables
- Wash and prep vegetables: Thoroughly clean all vegetables under running water.
- Chop vegetables:
- Peel and dice potatoes into 1-inch cubes
- Cut cauliflower into small florets
- Dice carrots into small pieces
- Finely chop bell peppers
- Roughly chop tomatoes
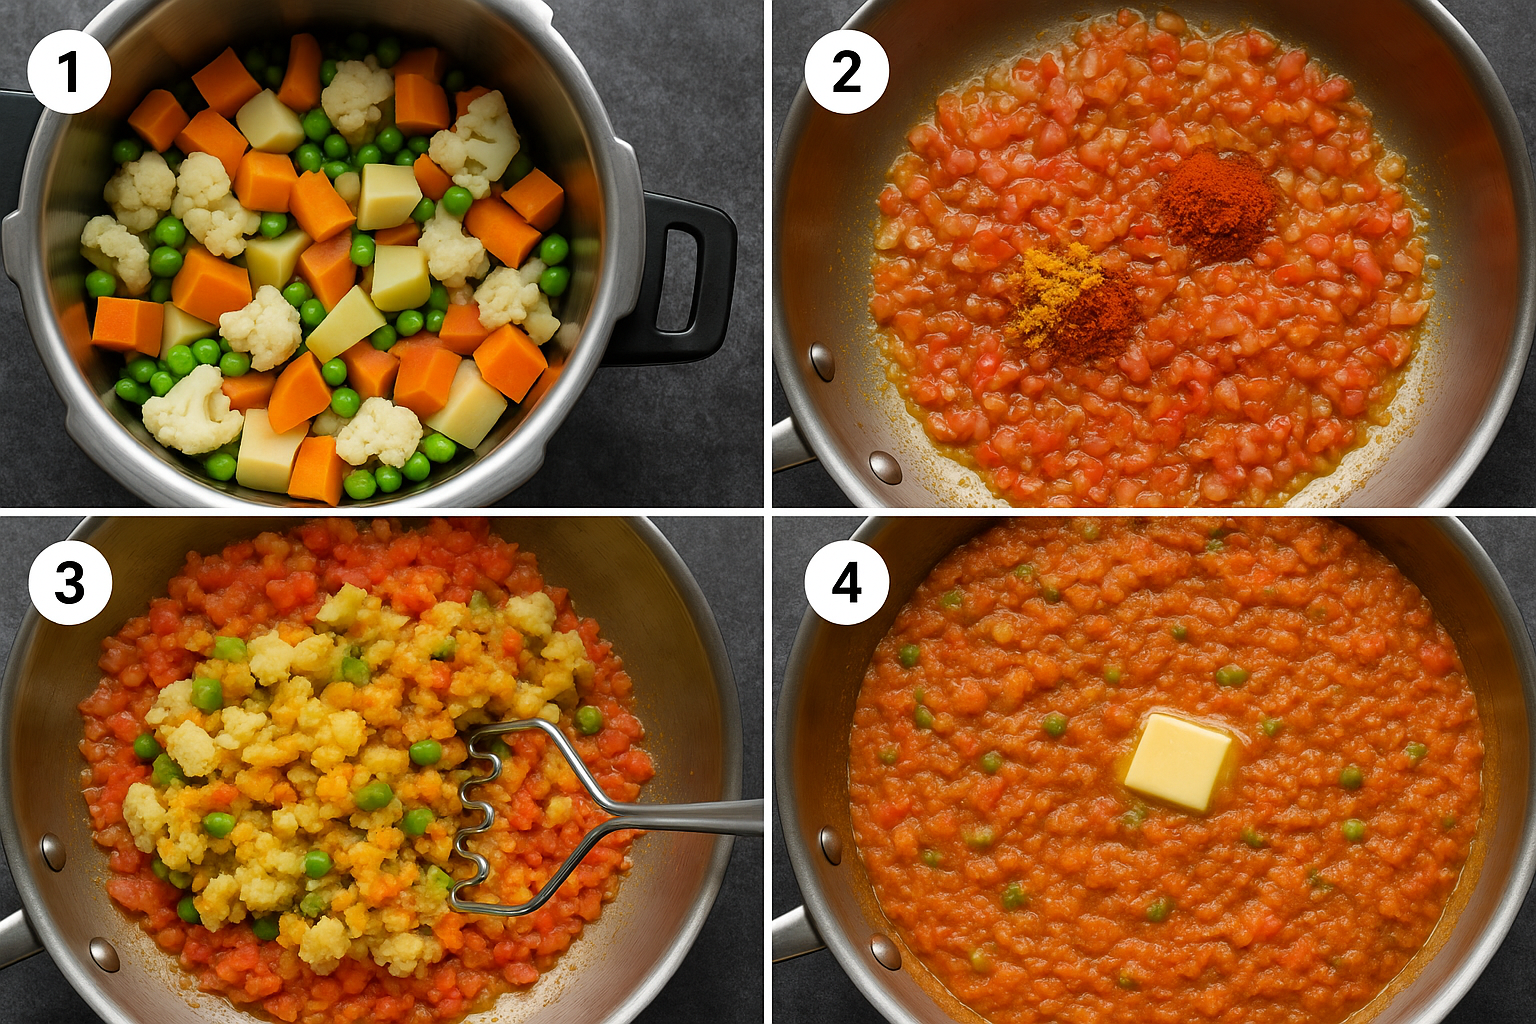
- Pressure cook base vegetables:
- In a pressure cooker, add potatoes, cauliflower, carrots, and peas
- Add 1 cup water and a pinch of salt
- Pressure cook for 3-4 whistles or until vegetables are completely tender
- Once done, drain excess water (reserve it) and mash the vegetables coarsely with a potato masher
Preparing the Bhaji Masala Base
- Heat a large, heavy-bottomed pan or tava (traditional flat pan) over medium heat.
- Add butter: Start with 3-4 tablespoons of butter and let it melt.
- Sauté aromatics:
- Add cumin seeds (1 teaspoon) and let them splutter
- Add finely chopped onions and sauté until golden brown (about 5-6 minutes)
- Add ginger-garlic paste and green chilies, sauté for another 2 minutes until raw aroma disappears
- Add spices:
- Add turmeric powder, red chili powder, and pav bhaji masala
- Stir quickly for 30 seconds to prevent burning
- Incorporate tomatoes:
- Add chopped tomatoes and bell peppers
- Add 1/2 teaspoon salt to help tomatoes release moisture
- Cook until tomatoes break down completely and oil begins to separate (about 8-10 minutes)
- Combine with mashed vegetables:
- Add the mashed vegetable mixture to the masala
- Mix thoroughly, breaking any lumps with the back of your spoon
- Add the reserved water from boiling vegetables to adjust consistency
- The bhaji should be neither too thick nor too runny – aim for a mashed potato-like consistency that slowly flows when tilted
Finishing the Bhaji
- Simmer and develop flavors:
- Reduce heat to low and let the bhaji simmer for 15-20 minutes, stirring occasionally
- This slow cooking allows flavors to meld together
- Final flavor adjustments:
- Add kasuri methi (crushed between palms)
- Adjust salt to taste
- Add 1-2 tablespoons lemon juice for tanginess
- Add 2 more tablespoons of butter and mix well
- Garnish preparation:
- Finely chop onions for garnish
- Chop coriander leaves
- Cut lemon into wedges
Preparing the Pav
- Slice the pav: Cut each pav horizontally through the middle, keeping one edge intact (like a book).
- Toast with butter:
- Heat a flat pan or tava
- For regular pav: Add 1-2 teaspoons butter per pav and place the rolls cut-side down
- For garlic pav: Mix minced garlic with butter, then apply to pav before toasting
- Toast until golden brown and crisp (about 1-2 minutes)
Serving Pav Bhaji the Authentic Way
- Plate presentation:
- Ladle hot bhaji onto a plate, creating a well in the center
- Place a generous dollop of butter (about 1 tablespoon) in the well
- Sprinkle finely chopped onions on one side
- Garnish with fresh coriander leaves
- Place lemon wedges on the side
- Serve hot pav on the side or slightly overlapping the bhaji
- Eating technique:
- The traditional way to enjoy pav bhaji is to tear a piece of pav, dip it in the bhaji, and eat them together
- Squeeze lemon juice over bhaji and add raw onions according to taste
Expert Tips for Perfect Pav Bhaji
Achieving the Right Texture and Consistency
The perfect bhaji has a balance of smoothness and texture. Here are some professional tips:
- Mashing technique: Don’t over-mash the vegetables to a completely smooth paste. Some small chunks add pleasant texture.
- Butter quantity: Be generous with butter – authentic pav bhaji uses at least 1/2 cup butter for 4 servings. This creates the signature glossy look and rich mouthfeel.
- Simmer time: The longer you simmer, the better the flavors develop. Street vendors often let their bhaji simmer for hours, adding butter periodically.
- Resting period: If possible, let the bhaji rest for 30 minutes after cooking, then reheat before serving. This rest period allows flavors to intensify.
Common Mistakes to Avoid
Even experienced cooks can make these errors when preparing pav bhaji:
- ❌ Undercooking vegetables: Vegetables must be thoroughly cooked to mash properly.
- ❌ Burning the spices: Add spice powders to oil briefly, then quickly add tomatoes to prevent burning.
- ❌ Using too little butter: Skimping on butter results in dry, less flavorful bhaji.
- ❌ Incorrect vegetable proportions: Using too many watery vegetables like capsicum or tomatoes can make bhaji runny.
- ❌ Serving with cold pav: Always toast the pav right before serving.
Storage and Reheating Instructions
Pav bhaji actually tastes better the next day as flavors continue to develop:
- Refrigeration: Store bhaji in an airtight container for up to 3 days.
- Freezing: Bhaji freezes well for up to 1 month. Thaw overnight in refrigerator before reheating.
- Reheating method:
- Heat bhaji in a pan over medium-low heat
- Add 2-3 tablespoons water to adjust consistency
- Add a fresh dollop of butter while reheating
- Stir occasionally to prevent sticking
- Pav storage: Store unused pav in a ziplock bag at room temperature for 1-2 days, or refrigerate for longer shelf life.
Popular Pav Bhaji Variations
Regional Adaptations Across India
Pav bhaji has evolved differently across various regions of India:
- Kolhapuri Pav Bhaji: From Maharashtra’s spice capital, this version is significantly spicier with extra chilies and a special Kolhapuri masala.
- Delhi-Style Pav Bhaji: Features more garam masala and often includes paneer (Indian cottage cheese) for added richness.
- Gujarati Pav Bhaji: Slightly sweeter with the addition of a little sugar or grated apple.
- South Indian Fusion: Incorporates curry leaves, mustard seeds, and sometimes coconut for a South Indian twist.
Specialty Pav Bhaji Varieties
These popular variations offer unique twists on the classic:
- Cheese Pav Bhaji:
- Top hot bhaji with grated cheese (preferably Amul cheese)
- Cover briefly to melt the cheese
- Garnish with more butter and coriander
- Jain Pav Bhaji:
- Omits onions, garlic, and root vegetables
- Uses more bell peppers and peas for flavor
- Often includes raw banana as a substitute for potato
- Khada Pav Bhaji (Chunky Pav Bhaji):
- Vegetables are chopped rather than mashed
- Creates a more textured, chunky consistency
- Popular in parts of Gujarat
- Paneer Pav Bhaji:
- Adds cubed or grated paneer to regular bhaji
- Provides extra protein and richness
- Particularly popular in North India
- Tava Pav Bhaji:
- Cooked and served on a large iron tava (griddle)
- Continuously stirred and mixed on the hot surface
- Develops a slightly smoky flavor from the tava
Dietary Adaptations
Pav bhaji can be modified to suit various dietary needs:
- Vegan Pav Bhaji: Substitute butter with oil or vegan butter. Use vegan bread rolls.
- Gluten-Free Version: Serve with gluten-free bread or as a bowl with rice instead of pav.
- Low-Calorie Option: Reduce butter quantity, use more cauliflower and less potato, serve with multigrain bread.
- Protein-Enhanced: Add green peas, tofu, or soya chunks to increase protein content.
Nutritional Information and Health Considerations
Calorie and Macronutrient Breakdown
A typical serving of pav bhaji (1 cup bhaji with 2 pavs) contains approximately:
| Nutrient | Amount | % Daily Value* |
|---|---|---|
| Calories | 450-500 | 22-25% |
| Carbohydrates | 60-65g | 20-22% |
| Protein | 10-12g | 20-24% |
| Fat | 20-25g | 30-38% |
| Fiber | 8-10g | 32-40% |
| Sodium | 800-1000mg | 35-43% |
*Based on a 2,000 calorie diet
Health Benefits of Ingredients
Despite being indulgent, pav bhaji contains several nutritious components:
- Vegetable diversity: Contains multiple vegetables providing various vitamins and minerals.
- Tomatoes: Rich in lycopene, an antioxidant linked to heart health and cancer prevention.
- Spices: Many spices in pav bhaji masala have anti-inflammatory and digestive benefits.
- Garlic and ginger: Offer immune-boosting and anti-inflammatory properties.
- Coriander garnish: Provides vitamin K, vitamin C, and potassium.
Making Pav Bhaji Healthier
For a more nutritious version, consider these modifications:
- Reduce butter: Cut butter quantity by half and substitute with olive oil.
- Increase vegetable ratio: Add more cauliflower, carrots, and bell peppers while reducing potato content.
- Whole grain pav: Use whole wheat or multigrain bread rolls instead of white pav.
- Add protein: Incorporate green peas, edamame, or tofu for additional protein.
- Control sodium: Reduce salt and use low-sodium butter.
- Baked pav: Toast pav in oven with minimal butter instead of pan-frying.
Pairing Suggestions and Complete Meal Ideas
Traditional Accompaniments
These classic sides complement pav bhaji perfectly:
- Masala Chaas: Spiced buttermilk helps balance the richness of pav bhaji.
- Kachumber Salad: A simple salad of cucumber, tomato, and onion with lemon juice and chaat masala.
- Papad: Roasted or fried pappadum adds a crispy texture contrast.
- Pickle (Achaar): A small amount of spicy Indian pickle adds an extra flavor dimension.
Beverage Pairings
These drinks work particularly well with pav bhaji:
- Sweet Lassi: The cooling yogurt drink balances the spiciness.
- Masala Chai: The spiced tea complements the flavors in the bhaji.
- Fresh Lime Soda: A refreshing, effervescent palate cleanser.
- Jeera (Cumin) Water: Aids digestion and complements the spices.
Complete Mumbai Street Food Experience
For an authentic Mumbai street food feast, serve pav bhaji alongside:
- Vada Pav: Spicy potato fritters in bread rolls – Mumbai’s other famous street food.
- Bhel Puri: Puffed rice with vegetables and tamarind chutney.
- Sev Puri: Crisp puris topped with potatoes, chutneys, and sev (crunchy noodles).
- Falooda: A sweet, rose-flavored milk drink with vermicelli and basil seeds for dessert.
The Art of Presentation and Serving
Traditional Serving Style
In Mumbai’s street food stalls, presentation follows a specific style:
- The sizzling tava: Bhaji is often served directly from the hot tava, with butter melting dramatically on top.
- The butter well: A small depression is made in the center of the bhaji where a cube of butter is placed to melt.
- Compartmentalized plate: Bhaji occupies most of the plate, with separate sections for chopped onions, lemon wedges, and sometimes extra butter.
- Pav arrangement: Pavs are typically stacked in pairs, with the cut sides facing inward to keep them soft until eating.
Modern Plating Techniques
For a contemporary restaurant-style presentation:
- Individual servings: Serve bhaji in small copper or brass bowls with pav on the side.
- Deconstructed elements: Place garnishes in small bowls for personalized addition.
- Artistic butter placement: Create butter curls or shaped butter pats instead of plain cubes.
- Edible flowers: Add nasturtium or marigold petals for color and elegance.
- Microgreens: Substitute some coriander with microgreens for a gourmet touch.
Creating an Authentic Street Food Experience at Home
To recreate the vibrant atmosphere of Mumbai’s street food stalls:
- Serve in metal plates: Traditional street food is often served on stainless steel plates.
- Interactive serving: Set up a “pav bhaji station” where family members can customize their own plates.
- Sounds and smells: Play Bollywood music and ensure the butter sizzles audibly when added to hot bhaji.
- Theatrical elements: Mash some of the bhaji in front of guests or toast pav dramatically with lots of butter.
- Street food accompaniments: Serve with paper napkins and provide small spoons for the bhaji.
Troubleshooting Common Pav Bhaji Problems
Texture Issues and Solutions
| Problem | Possible Cause | Solution |
|---|---|---|
| Bhaji too watery | Undercooked vegetables, too much water added | Simmer uncovered to reduce liquid; add 1-2 mashed potatoes |
| Bhaji too thick | Too many starchy vegetables, over-reduction | Add hot water gradually while stirring; add more butter |
| Lumpy texture | Inadequate mashing, vegetables not cooked enough | Cook vegetables longer; use potato masher while hot |
| Vegetables separating | Insufficient cooking time together | Simmer all combined ingredients longer; add butter |
Flavor Balance Corrections
If your pav bhaji doesn’t taste right, here’s how to fix common flavor issues:
- Too spicy: Add 1-2 tablespoons of butter and 1 tablespoon of cream or milk to mellow the heat.
- Not spicy enough: Add 1/2 teaspoon red chili powder or 1 teaspoon pav bhaji masala mixed with a little water.
- Too sour: Add 1/2 teaspoon sugar to balance acidity from tomatoes or lemon.
- Too bland: Add salt gradually (1/4 teaspoon at a time), more pav bhaji masala, and a squeeze of lemon.
- Lacking richness: Add more butter and simmer for 5-10 minutes longer.
Color and Appearance Fixes
The signature red-orange color is important for authentic pav bhaji:
- Too pale: Add 1/4 teaspoon Kashmiri red chili powder (for color without heat) or 1-2 tablespoons tomato paste.
- Too brown: Likely caused by burning spices or onions. Add more tomatoes and a pinch of turmeric to brighten.
- Dull appearance: Add a final dollop of fresh butter on top before serving to create an appetizing gloss.
- Uneven texture: Mash again while hot, leaving some small chunks for authentic texture.
Pav Bhaji in Popular Culture
Mumbai’s Iconic Pav Bhaji Destinations
These legendary establishments have defined pav bhaji culture in Mumbai:
- Sardar Pav Bhaji (Tardeo): Operating since 1965, famous for using an entire brick of butter per serving.
- Cannon Pav Bhaji (Chowpatty): Known for its unique spice blend and perfectly textured bhaji.
- Maruti Pav Bhaji (Vile Parle): Celebrated for its consistent quality for over 40 years.
- Juhu Beach Pav Bhaji Stalls: The seaside setting adds to the experience of enjoying this street food.
- Khau Galli (various locations): These “food streets” feature multiple vendors competing for the best pav bhaji title.
Pav Bhaji in Media and Entertainment
This iconic dish frequently appears in Indian pop culture:
- Bollywood movies: Often featured in scenes depicting Mumbai city life or as comfort food for characters.
- Food travel shows: Anthony Bourdain, Gordon Ramsay, and other celebrity chefs have showcased pav bhaji in their Mumbai episodes.
- Social media influence: #PavBhaji regularly trends on Instagram and food blogs, with creative variations going viral.
- Cooking competitions: Frequently appears as a challenge dish in cooking shows like MasterChef India.
The Global Spread of Pav Bhaji
From its humble Mumbai origins, pav bhaji has gained international recognition:
- Indian diaspora influence: Indian communities worldwide have introduced pav bhaji to their adopted countries.
- Fusion adaptations: International chefs have created versions like pav bhaji pizza, pav bhaji pasta, and pav bhaji tacos.
- Restaurant adoptions: High-end restaurants in New York, London, and other major cities now offer gourmet versions with premium ingredients.
- Fast food chains: Several international Indian fast food chains feature pav bhaji as a menu staple.
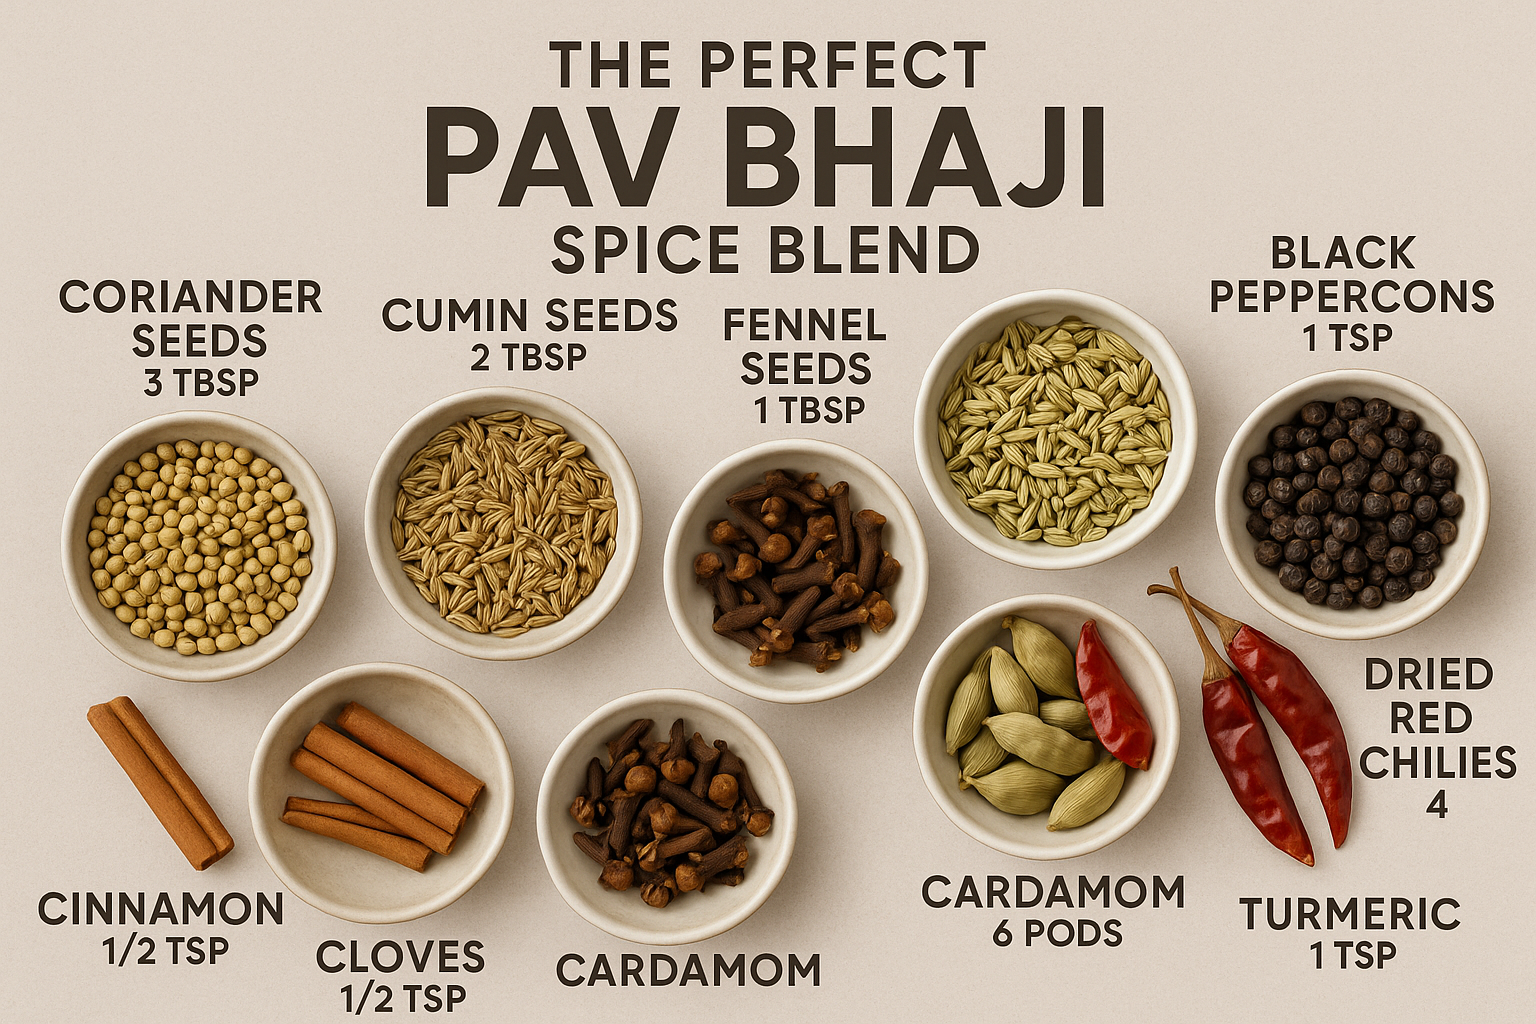
DIY Pav Bhaji Masala Recipe
Homemade Spice Blend Ingredients
For those who want to create their own authentic pav bhaji masala, here’s a detailed recipe:
Ingredients:
- Coriander seeds: 4 tablespoons
- Cumin seeds: 2 tablespoons
- Fennel seeds (saunf): 1 tablespoon
- Black peppercorns: 1 tablespoon
- Cinnamon stick: 1-inch piece
- Cloves: 8-10
- Black cardamom: 2 pods
- Green cardamom: 4 pods
- Dried red chilies: 6-8 (Kashmiri variety for color)
- Amchur (dried mango powder): 2 teaspoons
- Turmeric powder: 1 teaspoon
- Ginger powder: 1 teaspoon
- Asafoetida (hing): 1/2 teaspoon
Step-by-Step Preparation Method
- Dry roast whole spices:
- Heat a heavy pan on medium-low heat
- Add coriander seeds, cumin seeds, fennel seeds, peppercorns, cinnamon, cloves, and cardamoms
- Roast until aromatic and slightly darker (about 3-4 minutes), stirring constantly
- In the last 30 seconds, add dried red chilies
- Remove from heat and transfer to a plate to cool completely
- Grind the spices:
- Once cooled, transfer roasted spices to a spice grinder
- Grind to a fine powder
- Sieve the mixture to remove any coarse particles
- Grind any remaining coarse spices again
- Mix with powdered spices:
- In a bowl, combine the ground roasted spices with turmeric powder, amchur, ginger powder, and asafoetida
- Mix thoroughly to ensure even distribution
- Store properly:
- Transfer to an airtight glass container
- Store in a cool, dry place away from direct sunlight
- Label with the date of preparation
Usage and Storage Tips
- Potency: Homemade masala is more potent than store-bought versions, so use about 3/4 of the quantity called for in recipes.
- Shelf life: Properly stored, homemade pav bhaji masala remains fresh for 3-4 months.
- Aroma test: Check potency by smelling the masala – if the aroma has significantly diminished, it’s time to make a fresh batch.
- Quantity guide: This recipe yields approximately 1/2 cup of masala powder, enough for 6-8 batches of pav bhaji.
- Customization: Adjust the red chili quantity based on your heat preference.
Homemade Pav (Bread Rolls) Recipe
Ingredients and Equipment Needed
For those who want to make authentic Mumbai-style pav from scratch:
Ingredients:
- All-purpose flour (maida): 3 cups
- Active dry yeast: 2 teaspoons
- Sugar: 2 tablespoons
- Salt: 1 teaspoon
- Milk: 1 cup (lukewarm)
- Butter: 3 tablespoons (melted)
- Water: 1/4 cup (lukewarm, as needed)
- Egg: 1 (for egg wash, optional)
- Butter for brushing: 2 tablespoons
Equipment:
- Stand mixer with dough hook (or mixing bowl for hand kneading)
- Baking tray
- Pastry brush
- Clean kitchen towel
- Measuring cups and spoons
Pav Bhaji Recipe Calculator
Adjust ingredients based on your serving size
Your Customized Pav Bhaji Recipe
Step-by-Step Baking Instructions
- Activate the yeast:
- In a small bowl, combine lukewarm milk, sugar, and yeast
- Stir gently and let sit for 10 minutes until frothy
- If the mixture doesn’t foam, your yeast may be inactive – start over with fresh yeast
- Prepare the dough:
- In a large bowl, sift the flour and salt
- Make a well in the center and pour in the activated yeast mixture
- Add melted butter
- Mix to form a rough dough
- Add lukewarm water as needed to form a soft, slightly sticky dough
- Knead the dough:
- Transfer to a floured surface
- Knead for 8-10 minutes until smooth and elastic
- The dough should spring back when poked gently
- First rise:
- Place dough in a greased bowl
- Cover with a damp cloth or plastic wrap
- Let rise in a warm place for 1-1.5 hours until doubled in size
- Shape the pav:
- Punch down the risen dough to release air
- Divide into 12 equal portions
- Shape each portion into a smooth ball
- Place rolls on a greased baking tray, keeping them close but not touching
- Cover and let rise for another 30-45 minutes until puffy
- Bake the pav:
- Preheat oven to 375°F (190°C)
- Brush tops with milk or egg wash for a golden crust
- Bake for 15-18 minutes until golden brown
- Brush hot pavs with butter immediately after baking
Tips for Perfect Homemade Pav
- Flour quality: Use high-quality bread flour or all-purpose flour for the best texture.
- Yeast activation: Ensure milk is lukewarm (not hot) to properly activate yeast without killing it.
- Kneading technique: Proper kneading develops gluten, giving pav its characteristic chewy texture.
- Rising environment: For optimal rising, place dough in a warm, draft-free area (ideally 80-85°F/27-29°C).
- Spacing matters: Place dough balls about 1/2 inch apart so they rise to touch each other, creating the authentic pull-apart texture.
- Steam trick: Place a small oven-safe dish with water in the oven while baking to create steam, which helps develop a better crust.
- Storage: Homemade pav stays fresh for 2 days at room temperature in an airtight container, or freeze for up to 1 month.
Frequently Asked Questions About Pav Bhaji
Common Queries and Expert Answers
Q: Can I make pav bhaji without a pressure cooker?
A: Yes, you can boil the vegetables in a regular pot with a lid. It will take longer (about 25-30 minutes) but works just as well. Ensure vegetables are completely tender before mashing.
Q: Is there a substitute for pav bhaji masala?
A: In a pinch, you can use 1 tablespoon garam masala + 1 tablespoon coriander powder + 1 teaspoon cumin powder + 1 teaspoon red chili powder. The flavor won’t be identical but will be close.
Q: Can pav bhaji be made in advance for parties?
A: Absolutely! Pav bhaji actually tastes better when made a day ahead as flavors develop further. Reheat with a splash of water and fresh butter before serving.
Q: Why is my pav bhaji not red like restaurant versions?
A: Restaurant pav bhaji often gets its vibrant color from Kashmiri red chili powder and sometimes food coloring. Add 1-2 teaspoons of Kashmiri red chili powder for color without excessive heat.
Q: Is pav bhaji healthy?
A: Traditional pav bhaji is moderately high in calories due to butter content. However, it contains multiple vegetables, making it more nutritious than many fast foods. You can make healthier versions by reducing butter and using whole grain pav.
Q: Can I freeze pav bhaji?
A: Yes, the bhaji portion freezes well for up to 1 month. Thaw overnight in the refrigerator and reheat thoroughly with a little fresh butter. Freeze only the bhaji, not the pav.
Dietary Restriction Adaptations
Q: How can I make gluten-free pav bhaji?
A: The bhaji is naturally gluten-free. Serve with gluten-free bread rolls, or enjoy the bhaji portion with rice or gluten-free naan instead.
Q: Can pav bhaji be made vegan?
A: Yes, substitute butter with vegan butter or oil. Ensure the pav doesn’t contain milk or eggs, or use vegan bread alternatives.
Q: How to make Jain-friendly pav bhaji?
A: Omit onions, garlic, and potatoes. Use raw banana or sweet potato instead of regular potatoes, and increase the proportion of cauliflower and peas. Add more spices to compensate for the flavor difference.
Q: Is pav bhaji keto-friendly?
A: Traditional pav bhaji is not keto-compatible due to high carb content. However, you can make a keto version by using only low-carb vegetables (cauliflower, bell peppers, limited tomatoes) and serving without pav or with keto bread.
Conclusion: Mastering the Art of Pav Bhaji
Pav bhaji represents more than just a delicious meal – it embodies the spirit of Mumbai’s innovative food culture and the Indian knack for creating extraordinary flavors from ordinary ingredients. From its humble origins as a mill worker’s quick meal to its current status as an international street food sensation, pav bhaji’s journey mirrors India’s culinary evolution.
The perfect pav bhaji balances textures and flavors – the spicy, tangy, buttery bhaji contrasting beautifully with the soft, slightly sweet pav. While the recipe may seem complex at first, breaking it down into manageable steps makes it accessible to home cooks of all skill levels.
Remember that pav bhaji is forgiving and adaptable. Don’t be afraid to adjust spice levels, vegetable proportions, or butter quantity to suit your taste. The true spirit of this dish lies in its ability to bring people together – whether at a Mumbai street corner, a family dinner table, or a gathering of friends.
As you perfect your pav bhaji technique, you’ll develop an intuitive understanding of how the ingredients work together. Soon, you’ll be creating your own signature version that carries forward this beloved culinary tradition.
So heat up your pan, gather your ingredients, and embark on a flavorful journey to Mumbai’s streets – right from your own kitchen. Your perfect pav bhaji awaits!

y0gzt3
afqs02
jcr5oq
Thanks for sharing. I read many of your blog posts, cool, your blog is very good.
Your article helped me a lot, is there any more related content? Thanks!
I don’t think the title of your article matches the content lol. Just kidding, mainly because I had some doubts after reading the article. https://www.binance.info/de-CH/register?ref=W0BCQMF1
Your point of view caught my eye and was very interesting. Thanks. I have a question for you. https://accounts.binance.info/fr-AF/register-person?ref=JHQQKNKN
I have been browsing online more than three hours today, yet I never found any interesting article like yours. It is pretty worth enough for me. In my view, if all web owners and bloggers made good content as you did, the web will be much more useful than ever before.
**mitolyn official**
Mitolyn is a carefully developed, plant-based formula created to help support metabolic efficiency and encourage healthy, lasting weight management.
**boostaro reviews**
Boostaro is a purpose-built wellness formula created for men who want to strengthen vitality, confidence, and everyday performance.
**mounja boost**
MounjaBoost is a next-generation, plant-based supplement created to support metabolic activity, encourage natural fat utilization, and elevate daily energywithout extreme dieting or exhausting workout routines.
**aquasculpt**
aquasculpt is a premium metabolism-support supplement thoughtfully developed to help promote efficient fat utilization and steadier daily energy.
**herpafend**
Herpafend is a natural wellness formula developed for individuals experiencing symptoms related to the herpes simplex virus. It is designed to help reduce the intensity and frequency of flare-ups while supporting the bodys immune defenses.
**prostafense reviews**
ProstAfense is a premium, doctor-crafted supplement formulated to maintain optimal prostate function, enhance urinary performance, and support overall male wellness.
**men balance**
MEN Balance Pro is a high-quality dietary supplement developed with research-informed support to help men maintain healthy prostate function.
**neurosharp official**
Neuro Sharp is an advanced cognitive support formula designed to help you stay mentally sharp, focused, and confident throughout your day.
Merely wanna remark on few general things, The website style is perfect, the subject matter is really excellent : D.
A really good blog and me back again.
I used to be very pleased to search out this net-site.I wanted to thanks to your time for this excellent read!! I undoubtedly enjoying each little little bit of it and I have you bookmarked to take a look at new stuff you blog post.
Online games super mario play
Found a bride? proposal in Barcelona romantic scenarios, beautiful locations, photo shoots, decor, and surprises for the perfect declaration of love. Make your engagement in Barcelona an unforgettable moment in your story.
Проблемы с застройщиком? взыскать неустойка дду застройщик помощь юриста по долевому строительству, расчет неустойки, подготовка претензии и подача иска в суд. Защитим права дольщиков и поможем получить компенсацию.
Нужен юрист? адвокат арбитражный суд представительство в арбитражном суде, защита интересов бизнеса, взыскание задолженности, споры по договорам и сопровождение судебных процессов для компаний и предпринимателей.
Ищешь кран? кран шаровый под приварку для трубопроводов различного назначения. Надежная запорная арматура для систем водоснабжения, отопления, газа и промышленных магистралей. Высокая герметичность, долговечность и устойчивость к нагрузкам.
парфюмерия 2026 https://elicebeauty.com/parfyumeriya/filter/_m244_m256/
每天都在战争,希望2026和平.
Proposed to a girl #proposalinbarcelona
**backbiome**
Backbiome is a naturally crafted, research-backed daily supplement formulated to gently relieve back tension and soothe sciatic discomfort.
Качественное SEO https://outreachseo.ru продвижение сайта для бизнеса. Наши специалисты предлагают эффективные решения для роста позиций в поисковых системах. Подробнее об услугах и стратегиях можно узнать на сайте
Любишь азарт? https://school57.ru предлагает разнообразные игровые автоматы, настольные игры и интересные бонусные программы. Платформа создана для комфортной игры и предлагает широкий выбор развлечений.
Консультация семейного юриста поможет быстро разобраться в сложных жизненных ситуациях: развод, раздел имущества, алименты, споры о детях и брачные договоры. Перейдя по запросу адвокат по семейному законодательству – специалист объяснит ваши права, оценит перспективы дела и предложит оптимальный план действий. Получите профессиональную юридическую помощь и ответы на все вопросы по семейному праву.
Бесплатная консультация юриста — это возможность получить профессиональную правовую помощь без оплаты. Перейдя по запросу юридическая консультация 24 вы получите поддержку специалиста, который выслушает вашу ситуацию, оценит риски и подскажет возможные варианты решения: от подготовки документов до защиты интересов в суде. Такая консультация помогает понять свои права, избежать ошибок и выбрать правильную стратегию действий.
ванна ремонт под ключ цена ремонт санузла в хрущевке
**prostafense**
ProstAfense is a premium, doctor-crafted supplement formulated to maintain optimal prostate function, enhance urinary performance, and support overall male wellness.
**prodentim**
ProDentim is a distinctive oral-care formula that pairs targeted probiotics with plant-based ingredients to encourage strong teeth, comfortable gums, and reliably fresh breath.
**neurosharp**
Neuro Sharp is a modern brain-support supplement created to help you think clearly, stay focused, and feel mentally confident throughout the day.
**nerve calm**
NerveCalm is a high-quality nutritional supplement crafted to promote nerve wellness, ease chronic discomfort, and boost everyday vitality.
Хотите, чтобы ваш профиль или группа в Одноклассниках росли быстрее? Перейдя по запросу накрутка подписчиков в одноклассники от 10 подписчиков вы сможете увеличить количество подписчиков и активность на странице. Чем больше подписчиков — тем выше доверие и интерес к вашему аккаунту. Начните развивать свою страницу уже сегодня!
Хотите быстро развить канал на Rutube? Накрутка подписчиков Rutube поможет увеличить аудиторию, повысить доверие к каналу и ускорить продвижение видео. Перейдя по запросу накрутка просмотров в рутубе вы получите живых подписчиков, плавное добавление и безопасные методы продвижения. Отличное решение для новых и развивающихся каналов, которым важно быстрее набрать активность и привлечь больше просмотров. Начните рост канала уже сегодня.
Накрутка подписчиков Rutube поможет быстро увеличить аудиторию канала и повысить доверие к контенту. Живые подписчики создают активность, улучшают видимость роликов и привлекают новых зрителей. Перейдя по запросу как накрутить подписчиков в рутуб вы получите быстрый старт канала, безопасные методы продвижения и стабильный рост аудитории без отписок. Отличное решение для тех, кто хочет быстрее развить канал на Rutube.
Продвигайте свой аккаунт быстрее с помощью накрутки подписчиков в TikTok. Перейдя по запросу накрутка подписчиков тикток без отписок вы сможете увеличить количество фолловеров, повысить доверие к профилю и привлечь больше просмотров и лайков. Быстрая и безопасная накрутка поможет вашему контенту попасть в рекомендации и ускорить рост аккаунта. Подходит для блогеров, брендов и бизнеса, которые хотят развиваться в TikTok и получать больше охватов.
Can you be more specific about the content of your article? After reading it, I still have some doubts. Hope you can help me. https://www.binance.com/join?ref=JW3W4Y3A
**back biome**
Backbiome is a naturally crafted, research-backed daily supplement formulated to gently relieve back tension and soothe sciatic discomfort.
Бесплатная консультация семейного юриста — это возможность быстро разобраться в сложной ситуации и понять свои права. Перейдя по запросу юридическая консультация по семейным вопросам бесплатно в Москве юрист поможет вам по вопросам развода, алиментов, раздела имущества, опеки над детьми и другим семейным спорам. Разъясним перспективы дела и подскажем оптимальное решение. Получите профессиональную помощь без оплаты и лишних обязательств.
Бесплатная консультация юриста по расторжению брака поможет разобраться в ваших правах и возможностях при разводе. Специалист объяснит порядок развода через суд или ЗАГС, подскажет, как решаются вопросы раздела имущества, алиментов и проживания детей. Перейдя по запросу бесплатная юридическая помощь по разводам вы получите профессиональные рекомендации и ответы на все вопросы, чтобы пройти процедуру развода максимально спокойно и с защитой ваших интересов.
ремонт ванной комнаты цена https://remont-vannoy-spb.ru
Юридическая консультация по разделу имущества поможет защитить ваши права и избежать ошибок при разводе или спорах между собственниками. Переходите по запросу цена адвоката по разделу имущества – юрист оценит ситуацию, разъяснит перспективы дела, подскажет, как правильно оформить документы и выстроить стратегию. Вы получите чёткий план действий и поддержку на каждом этапе — от переговоров до суда.
Бесплатная консультация юриста по взысканию алиментов — первый шаг к защите ваших прав и интересов ребёнка. Переходите по запросу адвокат по взысканию алиментов и получите разбор именно вашей ситуации, узнайте порядок действий, какие нужно собрать документы и оценку перспектив дела. Поддержка на каждом этапе — от обращения в суд до фактического получения алиментых выплат. Запишитесь уже сегодня!
Certified platform yahoo spam filters tracks account health metrics proactively and notifies buyers of any status changes during the guarantee period. The platform combines speed and reliability — most products are delivered automatically within minutes after payment confirmation. Experienced buyers return for the consistency — same quality standards, same fast delivery, same professional support every time.
Dedicated platform is protonmail good helps performance teams find the right account infrastructure for scaling their advertising operations efficiently. Cross-platform inventory allows teams to source accounts for multiple advertising channels from a single trusted supplier relationship. From first purchase to ongoing scaling, the platform supports every stage of a media buyer’s operational journey.
Юридическая помощь по защите прав ребенка — это поддержка в самых важных ситуациях: от споров о месте проживания и алиментах до защиты от насилия и нарушения прав в школе. Переходите по запросу юридическая помощь по защите прав детей и квалифицированный юрист поможет отстоять интересы ребенка, подготовить документы и представить ваши интересы в суде, обеспечив безопасность и справедливость.
ProDentim is a distinctive oral-care formula that pairs targeted probiotics with plant-based ingredients to encourage strong teeth, comfortable gums, and reliably fresh breath.
Mitolyn is a carefully developed, plant-based formula created to help support metabolic efficiency and encourage healthy, lasting weight management.
PurDentix is a revolutionary oral health supplement designed to support strong teeth and healthy gums. It tackles a wide range of dental concerns
AquaSculpt is a high-quality metabolic support supplement created to help the body utilize fat more efficiently while maintaining steady, reliable energy levels throughout the day.
HeroUP is a premium mens wellness formula designed to support sustained energy, physical stamina, and everyday confidence.
Boostaro is a purpose-built wellness formula created for men who want to strengthen vitality, confidence, and everyday performance.
Backbiome is a naturally crafted, research-backed daily supplement formulated to gently relieve back tension and soothe sciatic discomfort.
InsuLeaf is a high-quality, naturally formulated supplement created to help maintain balanced blood glucose, support metabolic health, and boost overall vitality.
Maintaining prostate health is crucial for men’s overall wellness, especially as they grow older. Conditions like reduced urine flow, interrupted sleep
The bodys natural process of skin cell renewal is essential for preserving a smooth, healthy, and youthful-looking complexion.
Manergy is an advanced male vitality supplement created to help support healthy testosterone levels
Arialief is a carefully developed dietary supplement designed to naturally support individuals dealing with sciatic nerve discomfort while promoting overall nerve wellness.
Gluco6 is a natural, plant-based supplement designed to help maintain healthy blood sugar levels.
Kerassentials is an entirely natural blend crafted with 4 potent core oils and enriched by 9 complementary oils and vital minerals.
NativeGut is a precision-crafted nutritional blend designed to nurture your dog’s digestive tract.
NerveGenics is a naturally formulated nerve-health supplement created to promote nerve comfort, cellular energy support, antioxidant defense
ProstAfense is a premium, doctor-crafted supplement formulated to maintain optimal prostate function, enhance urinary performance, and support overall male wellness.
Nitric Boost Ultra is a daily wellness formula designed to enhance vitality and help support all-around performance.
GL Pro is a natural dietary supplement formulated to help maintain steady, healthy blood sugar levels while easing persistent sugar cravings.
NerveCalm is a high-quality nutritional supplement crafted to promote nerve wellness, ease chronic discomfort, and boost everyday vitality.
Prosta Peak is a high-quality prostate wellness supplement formulated with a comprehensive blend of 20+ natural ingredients and essential nutrients to support prostate health
Prostadine concerns can disrupt everyday rhythm with steady discomfort, fueling frustration and a constant hunt for dependable relief.
Visium Pro is an advanced vision support formula created to help maintain eye health, sharpen visual performance, and provide daily support against modern challenges such as screen exposure and visual fatigue.
ViriFlow is a dietary supplement formulated to help maintain prostate, bladder, and male reproductive health. Its blend of plant-based ingredients is designed to support urinary comfort and overall wellness as men age.
Тензоприбор предлагает калибровочные гири для весов нужного класса точности и номинальной массы для калибровки весов.
В нашей компании можно купить поверочные гири классов точности E1, E2, F1, F2, M1, M2.
Чем выше класс точности, тем меньше будет разница между номинальным и действительным значениями массы калибровочной гири.
проектирование домов дизайн интерьеров дизайн проекта дома
Расширенная статья здесь: https://write.as/vgump9ol2pygb.md
AquaSculpt is a high-quality metabolic support supplement created to help the body utilize fat more efficiently while maintaining steady, reliable energy levels throughout the day.
The bodys natural process of skin cell renewal is essential for preserving a smooth, healthy, and youthful-looking complexion.
MounjaBoost is a next-generation, plant-based supplement created to support metabolic activity, encourage natural fat utilization
Backbiome is a naturally crafted, research-backed daily supplement formulated to gently relieve back tension and soothe sciatic discomfort.
MounjaBoost is a next-generation, plant-based supplement created to support metabolic activity, encourage natural fat utilization
GL Pro is a natural dietary supplement formulated to help maintain steady, healthy blood sugar levels while easing persistent sugar cravings.
Nitric Boost Ultra is a daily wellness formula designed to enhance vitality and help support all-around performance.
NativeGut is a precision-crafted nutritional blend designed to nurture your dog’s digestive tract.
Prosta Peak is a high-quality prostate wellness supplement formulated with a comprehensive blend of 20+ natural ingredients and essential nutrients to support prostate health
Юридическая консультация по лишению родительских прав поможет оценить ситуацию, определить основания и выстроить грамотную стратегию защиты или подачи иска. Переходите по запросу адвокат по лишению родительских прав в москве – специалист разъяснит порядок действий и подготовит документы. Получите профессиональную поддержку и ответы на все вопросы уже на первой консультации.
Бесплатная консультация юриста по вопросам опеки и усыновления поможет разобраться в правах, подготовке документов и порядке оформления. Переходите по запросу юрист по усыновлению детей – специалист подскажет, как действовать в вашей ситуации, оценит риски и предложит оптимальное решение. Получите профессиональную помощь по делам опеки и попечительства на каждом шаге без лишних затрат.
看不懂但大受震撼
Накрутка просмотров в TikTok — это быстрый способ привлечь внимание к вашему контенту и ускорить рост аккаунта. Переходите по запросу просмотры тик ток и величьте показатели популярности, повысьте доверие аудитории и попадите в рекомендации. Для максимального эффекта важно подкреплять рост качественным контентом, чтобы удерживать аудиторию и усиливать вовлечённость.
Услуга накрутки просмотров на канал YouTube поможет быстро увеличить активность под вашими видео и привлечь внимание аудитории. Переходите по запросу накрутка лайков просмотров ютуб Кворк. Дополнительные просмотры повышают видимость роликов в рекомендациях, улучшают статистику канала и создают эффект популярности. Подходит для продвижения новых и существующих видео, увеличения охвата и ускоренного роста канала на YouTube.
Can you be more specific about the content of your article? After reading it, I still have some doubts. Hope you can help me.
Читать расширенную версию: https://domstav.ru
дизайн интерьера квартиры 25 кв услуги дизайнера квартиры
студии дизайна интерьера спб дизайн купить проект
Продвигайте свой канал в Яндекс Дзен быстрее: увеличьте число подписчиков и создайте эффект популярности. Переходите по запросу подписчики яндекс дзен. Накрутка поможет привлечь внимание новой аудитории, повысить доверие к каналу и ускорить рост. Подходит для новых и развивающихся блогов, чтобы быстрее выйти в рекомендации и усилить продвижение контента.
Продвигайте свой канал быстрее с услугой накрутки подписчиков в YouTube. Увеличьте количество фолловеров, повысьте доверие к каналу и привлеките новую аудиторию. Переходите по запросу you tube подписчики Кворк. Быстрый старт для блогеров, брендов и экспертов. Живые и качественные подписчики, безопасное продвижение и заметный рост популярности вашего контента. Начните развивать канал уже сегодня!
Маркетплейс 1С-Битрикс — это официальный каталог готовых решений, модулей и интеграций для сайтов на платформе Bitrix. Переходите по запросу каталог модулей Битрикс и вы найдете расширения для интернет-магазинов, CRM, SEO, аналитики, платежных систем и автоматизации бизнеса. Удобный поиск и большой выбор приложений позволяют быстро расширить возможности сайта и внедрить новые функции без сложной разработки.
Very good i like it
Платформа 1C-Bitrix — это комплекс программных продуктов для создания сайтов, интернет-магазинов и корпоративных порталов. Переходите по запросу купить программное обеспечение Bitrix. Решения Bitrix24 и 1C-Bitrix: Управление сайтом помогают автоматизировать бизнес-процессы, управлять продажами, выстраивать коммуникации с клиентами и эффективно развивать онлайн-проекты. Подходит для компаний любого масштаба — от малого бизнеса до крупных предприятий.
Бесплатная юридическая консультация поможет разобраться в сложной ситуации и понять, какие действия предпринять дальше. Переходите по запросу бесплатная юридическая консультация юриста онлайн и вы сможете задать вопрос юристу онлайн и получить разъяснение по гражданским, семейным, трудовым, жилищным и другим правовым вопросам. Специалист подскажет возможные решения, объяснит ваши права и поможет оценить перспективы дела. Консультация доступна онлайн и по телефону, быстро и без лишних формальностей.
Ищете надежные лицензии для 1С-Битрикс? Мы предлагаем легальные решения для всех типов проектов: интернет-магазинов, корпоративных сайтов и порталов. Переходите по запросу cms 1C Bitrix. Быстрая активация, официальная поддержка и выгодные условия – обеспечьте своему веб-проекту стабильную работу и защиту с надежным ПО уже сегодня!
Старый паркет? https://shlifovka-parketa.ru профессиональное восстановление деревянного пола без пыли и лишних затрат. Удаляем царапины, потемнения и старое покрытие, возвращаем гладкость и естественный цвет. Используем современное оборудование, выполняем циклевку, шлифовку и лакировку паркета под ключ с гарантией качества и точным соблюдением сроков.
Today’s Top Stories: https://yaskiapeduli.org/indian-mature-porn-movies/
Our top selection: https://www.abdgochizmetleri.com/ten-better-on-line-black-jack-the-real-deal-money-gambling-enterprises-to-experience-inside-the-2026/
Лицензия «Битрикс: Управление сайтом – Старт» — оптимальное решение для создания небольшого сайта, лендинга или корпоративной страницы. Переходите по запросу 1C Битрикс Старт. Редакция включает базовые инструменты для управления контентом, готовые модули, защиту сайта и удобную административную панель. Подходит для быстрого запуска проекта на CMS 1C-Битрикс с возможностью дальнейшего масштабирования и перехода на более функциональные редакции.
More on our website: https://hamptonstohollywood.com/lifestyle/15-things-cruel-intentions-taught-us/
Our top selection: https://www.la-revanche-des-sites.fr/blog/totally-free-gender-video-clips-hot-porno-video-clips
Hot Topics: https://e-mixbd.com/2026/03/19/finest-web-based-casinos-within-the-florida-2026-tech-basic-playing-book/
Don’t miss it here: https://hongkongtogel.net/2500-invited-gambling-enterprise-incentive/